This is the first of many videos I hope to be making as I review for the FE exam. This first video is about the general approach to solving a typical engineering problem. The five “easy” steps and are consistent with what might be expecting in homework or on a test. I’m trying to determine what might be best to start with, maybe chemistry or circuits?
Here is a recap:
Step 1: Read or define the problem.
• Briefly describe the problem or what you seek to know.
• Note the given/known information.
• Understand and make clear your objectives.
Step 2: Draw a schematic/diagram of the problem.
• Keep is simplified and relevant to the problem
• Include key features.
• Label important information.
Step 3: State assumptions and approximations.
• Keep track of simplifications.
• Present reasonable values for required information.
• Mention physical laws.
Step 4: Begin calculations.
• Write down relevant equations.
• Solve and simplify equations as much as possible before substituting.
• Mind your units and significant digits.
Step 5: Most important! Critique your answers.
• Check to see if answers make sense.
• Mention key points for the future you.
• Mention important limitations for answer.
Rinse and repeat!
Friday, December 9, 2011
Wednesday, November 23, 2011
How to Change a Flat Tire
How to Replace a Car Tire with a Spare. I sometimes refer the to bolts as nuts but they are bolts. Also, please look to your owners manual for the correct torquing on the bolts.
Monday, October 24, 2011
Altoids Tin Soldering Fumes Filter
How to build a soldering fumes filter. When soldering, you want to work in a well ventilated area and try not to breath in the smoke. Some costly filters exist on the market but I will be showing you how to build a small Altoids tin sized filter from scratch. This devise will not work as well as its larger and more expensive cousins, but it will direct most the fumes from floating up into your face. In addition, it’s just plain fun to build! I go through most of the steps within the video at the end of this post except cutting the tin.
Here it what you need!
• Altoids tin or similar container (At least as large)
• Two 9v Batteries
• Two 9v Battery Connectors (The soft kind as the solid kind will not fit)
• 40mm Computer Fan
• 7812 Voltage Regulator
• Small On/Off Switch
• Carbon Filter (I purchased mine at a pet store)
Extra!
• Loose Wiring (you may already have enough extra wiring from the battery connectors and fan)
• Shrink Wrap or Electrical Tape
• Typical Screws, Bolts and Nuts (I didn’t need any as all the parts fit snugly within the tin)
Tools!
• General Soldering Iron and Equipment
• Power Drill and/or Dremel with accompanying bits
• Heat Gun (Only if you’re using shrink wrap)
Once you have collected all together your parts, plan out how you are going to want to fit all the pieces into the tin. Once you have placed down where everything will go you want to begin soldering the components. Remember you want the wire to have a little wiggle room but mostly be tight to the distance the wire needs to travel. Follow the wiring diagram given below.

Here is how I fit all my components together.

When you have finished soldering the pieces together, They should look something like the picture below.

Cut out the filter to the shape of your fan. There will not be room for extra filter.

Install all the components and mark out where you need to cut the two holes for your fan, and hole for the switch: A Dremel will be very helpful for this.

Once all is cut out, Re-install the parts and your done!

Thursday, July 28, 2011
How to Replace a Watch Battery
Replaced a watch battery recently and though it would be helpful to those who didn't know where to begin. Below is a how-to for replacing batteries on simple watches. Some watches have screws holding on the back and do not just pop off like this one.
Clean Your Workspace

A clean workspace is a productive workspace. By taking a little time here and there to prevent clutter, you will be surprised to find your project finish up faster. This is simply because you spend less time looking for small pieces and parts, the tools you need are at hand, there generally more room to finagle components, and you will have less accidents (especially with coffee). Here are some tips I try to follow in no specific order of importance.
1. Have a trashcan nearby and dump out your trash BEFORE it’s overflowing. When you’re constantly dealing with bits of stuck-to-its-self-tape, clipped wire tips, busted plastic, etcetera , it’s better to just throw them out then let them build up in all the corners of your desk. Fight the temptation to fit just one more piece in the trash when you already have a mound at the top.
2. Be honest with yourself about how frequently you are using something. If you have to solder just a small part, solder it and put the gun back. Sure, you MAY have to use it once more later but until then you’re going to waste time stumbling over it. Time to drill a hole: is it worth bring over ALL the drill bits if you only need to use one or two bits?
3. Keep your receipts together and not floating around your desk or in bags. Often you didn’t buy enough of something (or broke it) and need to get another but done remember exactly the type you got!
4. Vacuums are your best friend. If you’re doing something that is going to make a mess like drilling through plastic, vacuum the waste. Your lungs are desk will thank you. Be careful not to suck up tiny screws.
5. Bolts, screws, and nuts. Keep them separated, keep them organized. It’s amazing how much faster things get done if you have these things separated out and available. If you don’t have enough of a collection for large storage box with lots of slots you can use ziplock bags and a sharpie.
6. Have plenty of light. I have two lamps and a third snake light. Flashlights are great too. I personally like the small LED lights designed for key chain flashlights as they take up very little room and they can fit into many off odd spots. Typically you want enough lights to prevent lots of shadows.
7. Don’t work on a desk you’re not willing to destroy. Accidents happen and it will be your workspace that pays.
Wednesday, July 20, 2011
Monday, July 18, 2011
Power Assisted Peddler Calf Support
Finished a new project where I adding calf support to a power assisted peddler. An assisted peddler workings like an exercise bike but uses a motor to rotates your legs. The photo below shows the one I worked on.
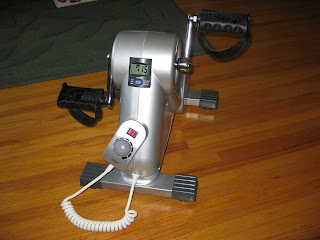
This machine is great for physical rehabilitation on those who have little or no ability to move their legs. Unfortunately the pedals want to make your knees fly in all sorts of directions. In my market analysis I found some pedals with calf support but the companies would like to charge people upwards of 200$. The photo below shows an example found through a simple Google search.

Fortunately, I was provided with some leg splints to act as the supports. Leg splints can be very expensive but it is possible to find some modestly priced ones with a little patients. I've posted a link to a brace I found on amazon here: Swede-O Deluxe Padded Plantar Fasciitis Night Splint, Gray or Night Splint by Pro-Tec Athletics
 If all else fails, some wide PVC piping attached to flat plastic could serve as a splint. Next I needed to engineer some way to attach the splints to the pedals.

Engineering a unique holding piece would have been expensive and taken too much time so I was hoping to be able to find something already made which would hold onto the pedal. After looking to McMaster-Carr for some inspiration I was confident I could find either a beam hanger or a pipe hanger which could meet my application. At the hardware store I was able to find a 3/4 inch pipe repair clamp (about 5$ each) which when fully opened, held the pedal perfectly.


I then picked up some inexpensive small steel plates along with some attributed bolts and nuts. Over all the parts cost around 12$. I then drilled matching holes in the splint foot and steel plates so that I could bolt together a steel-splint-pedal-clamp-sandwich. The bolt heads stuck out a bit but could not be felt through the foam padding placed over the plastic foot.


Some simple straps that came with the splint to hold the legs in are not shown. All together, this build provides a simple and inexpensive solution which may be repeated. If you have any question please email me!

This machine is great for physical rehabilitation on those who have little or no ability to move their legs. Unfortunately the pedals want to make your knees fly in all sorts of directions. In my market analysis I found some pedals with calf support but the companies would like to charge people upwards of 200$. The photo below shows an example found through a simple Google search.

Fortunately, I was provided with some leg splints to act as the supports. Leg splints can be very expensive but it is possible to find some modestly priced ones with a little patients. I've posted a link to a brace I found on amazon here: Swede-O Deluxe Padded Plantar Fasciitis Night Splint, Gray

Engineering a unique holding piece would have been expensive and taken too much time so I was hoping to be able to find something already made which would hold onto the pedal. After looking to McMaster-Carr for some inspiration I was confident I could find either a beam hanger or a pipe hanger which could meet my application. At the hardware store I was able to find a 3/4 inch pipe repair clamp (about 5$ each) which when fully opened, held the pedal perfectly.

I then picked up some inexpensive small steel plates along with some attributed bolts and nuts. Over all the parts cost around 12$. I then drilled matching holes in the splint foot and steel plates so that I could bolt together a steel-splint-pedal-clamp-sandwich. The bolt heads stuck out a bit but could not be felt through the foam padding placed over the plastic foot.


Some simple straps that came with the splint to hold the legs in are not shown. All together, this build provides a simple and inexpensive solution which may be repeated. If you have any question please email me!
Wednesday, July 13, 2011
Fixing a Tail Light
Fixing a dead tail light is as simple as changing any old light bulb except these are hidden inside a car. Getting access to the bulb can vary depending on your car so this video may not apply to your make. Never the less, it may inspire you to fix it yourself!
How to replace a fourth generation (1999 to 2004) VW Jetta Tail Light.
How to replace a fourth generation (1999 to 2004) VW Jetta Tail Light.
First Post!
The purpose of this blog is to bring engineering projects, tools, and concepts to the everyday guy. Expect to see some very simple how-to's to more complicated engineering ideas and practice. I love to tinker and explore so with any luck, I can bring some of my excitement to you!
Subscribe to:
Comments (Atom)